

 中文 (中国)
This software is designed to achieve the effect of laser interaction with the human body for door opening and closing by integrating the detection function of a tof radar.
Highlights Introduction:
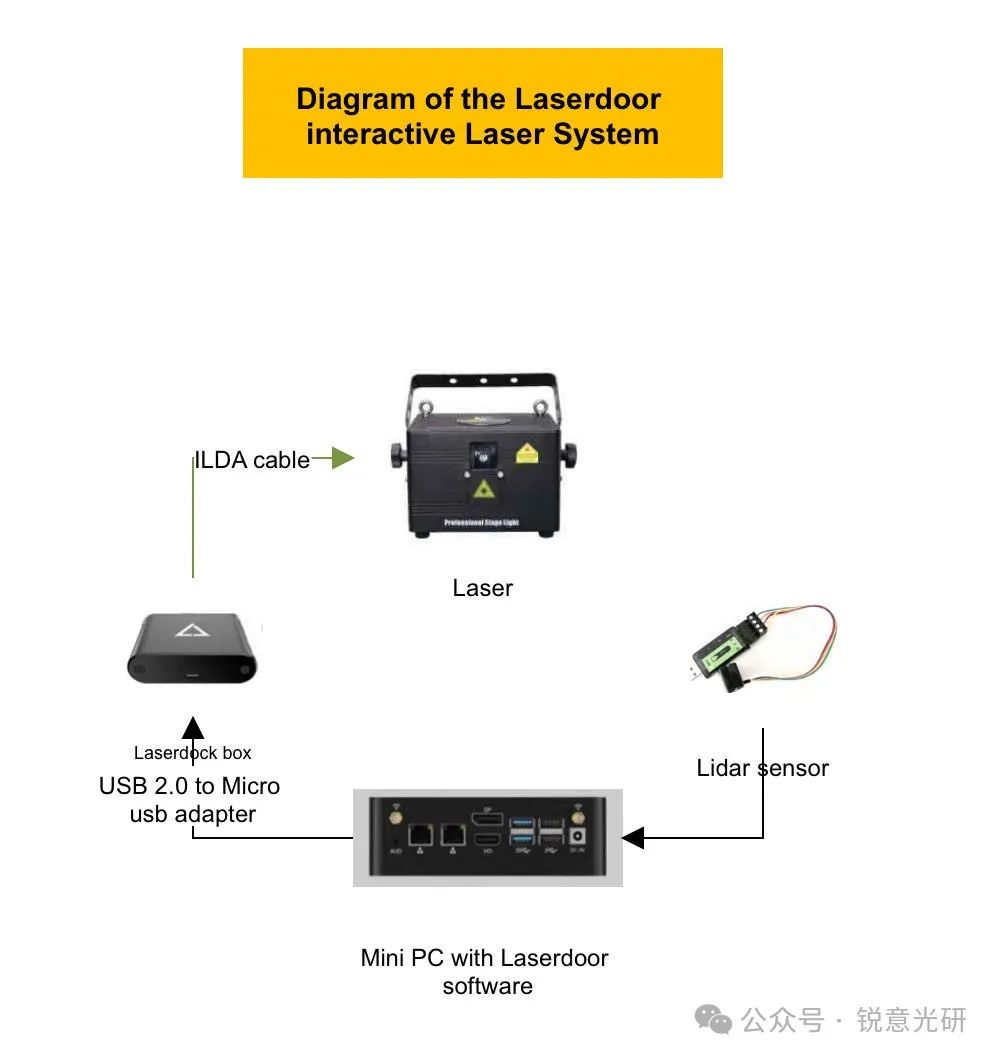
1. The maximum effective range of this radar sensor is 8 meters, with a field of view (FOV) of 27 degrees. It is recommended to install it at a height of around 5 meters. The package includes two ToF radars, which can be mounted on either side of the laser light exit to detect human movement in two directions. As long as a person appears within the detection range of the sensor, the door opening effect will be automatically triggered. When a person leaves the detection range of the radar sensor, the door closing effect will be automatically triggered.
2. The hardware of this system includes a mini-PC. All hardware can be conveniently installed together with the laser fixture, which also avoids the hassle of long-distance wiring. The mini-PC is equipped with a wireless network card that can act as a hotspot. During debugging, simply connect your phone to this hotspot and use a browser to access the host IP address to open the parameter debugging page. This completely eliminates the need to connect a monitor, keyboard, and mouse. When installing, ensure that the radar is securely fixed to the laser fixtrue body and aligned vertically with the laser light exit.
Details Explanation
 The software is divided into two parts: the left side is for settings related to the lidar and laserdoor . The right part is for settings related to the laser DAC box, laser preview, effect style switching, and color mode switching. The content of the right-hand page can be switched by using the LaserOS/Preview button in the Lidar settings page.
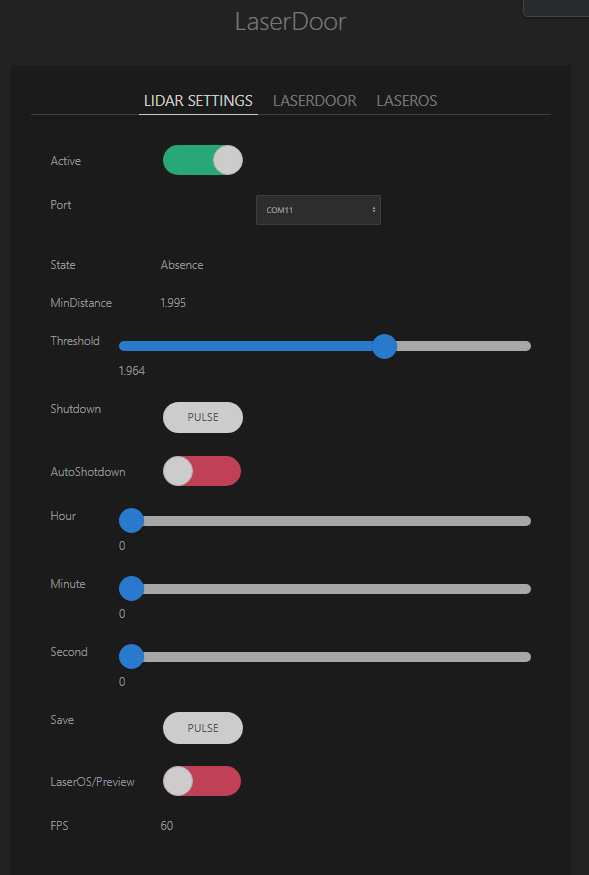
1. In the lidar settings section, ensure that the lidar is correctly connected to the PC before launching the software. Once the software is open, you can use the dropdown menu to select the correct connection port. Typically, this option is automatically recognized, so you can just keep the default setting. If you have multiple serial devices connected, you will need to confirm the connected port number.
After setting the specific port, you can directly click the activation button to start the lidar working. At this point, you can see the lidar’s detection status in the detection status area.
The detection status is divided into Presence/Absence states.
In the “Absence ” state, the laser display will be in a closed state. When someone enters the set detection area, it will automatically trigger the opening animation.
MinDistance here displays the real-time detection distance of the sensor. In fact, this value refers to the distance of the object that occupies the largest area within the detection range.
When applying it in practice, pay attention to the changes in this value when there is no one present. Set the threshold to be less than this MinDistance. When someone is detected, this MinDistance will be significantly less than the threshold value.
Also, note that the sensor should not be pointed at strong light or highly reflective objects, as this may affect the normal operation of the sensor.
Below is the Shutdown button. When you wish to shut down the system, please do not cut off the power directly; instead, click on this shutdown button. After the computer has completely shut down, then you can proceed to cut off the power, thus preventing damage to the computer system.
When the auto-shutdown button below is activated, you can set it to perform an automatic shutdown at a specified time.
The **Save** button is used to save all modified parameters in this software. The previous modifications will be automatically loaded the next time the software is opened.
Below that are the buttons for switching the display interface on the right-hand page. Keep them turned off when debugging these parameters using a browser.
At the bottom is the software’s operating frame rate, which usually stays around 60 FPS, indicating that the software is running smoothly.
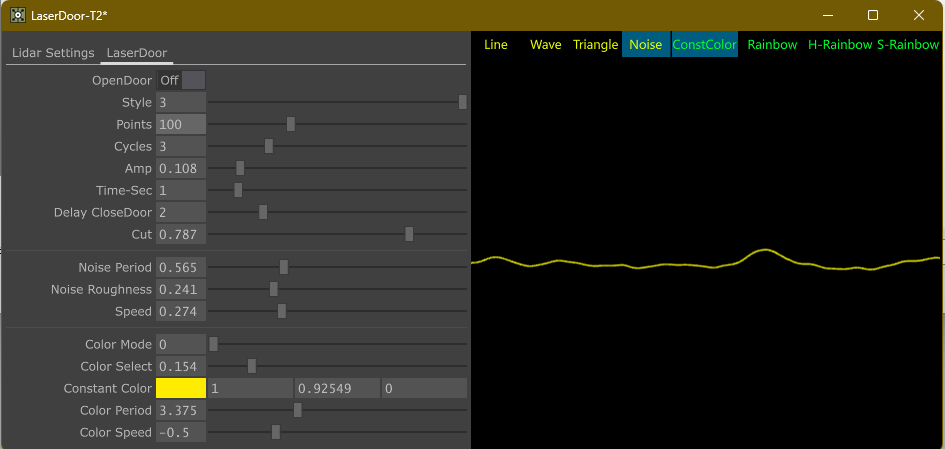
Next are the parameters related to the laserdoor page.
The open button can manually activate the test for the door-opening and -closing effects. When the lidar detection is activated, this button will be triggered automatically. If you want to manually test the opening and closing effects, please first turn off the lidar active button.
The style slider below is used to switch between different graphic styles. If you are using a monitor and adjusting directly with a mouse, you can simply click the style switch button above the laser preview image on the far right to switch graphic styles. This slider is mainly an option for adjustments when debugging manually in the browser.
The software has four built-in graphic styles: line, wave, triangle , and noise. Except for the line effect, the other three styles allow you to set the animation speed.
Next is the number of points, which defaults to 60. This can be adjusted based on the actual laser output effect. If there are too many points, it may cause the laser display to flicker.
The cycles slider is used to adjust the number of graphic loops for sine and triangle styles.
The amp slider is used to adjust the vertical range of motion for the sine, triangle, and noise styles.
The Time-Sec option is for adjusting the duration of the transition between the door-opening and -closing effects, with a default setting of 1 second.
The Delay CloseDoor option is used to prevent the door from closing due to rapid changes in data. The default value is 2 seconds.
The Cut slider is used to adjust the maximum opening extent, with a default value of 0.5.
The noise period slider is used to adjust the period of the noise wave pattern, affecting how frequently the noise pattern repeats.
The noise roughness slider is used to adjust the coarseness of the noise wave pattern; the smaller the value, the smoother the graphic will appear.
The speed slider is used to adjust the speed of animation changes for the sine, triangle, and noise effects.
Next is the color mode slider, which, like the style slider, is also for use when users are debugging with a mobile browser. On the display interface, you can directly click the four green buttons in the upper right corner of the laser preview screen to switch between constant color, rainbow, horizontal rainbow, and symmetrical rainbow modes.
When the color mode is switched to constant color, you can use the ConsColor adjustment options below to adjust the color used in the constant color mode. This feature is not supported for adjustment via a mobile browser.
The color period slider can adjust the transition of the rainbow to be more gradual.
The color speed slider can adjust the direction and speed of the rainbow color changes.
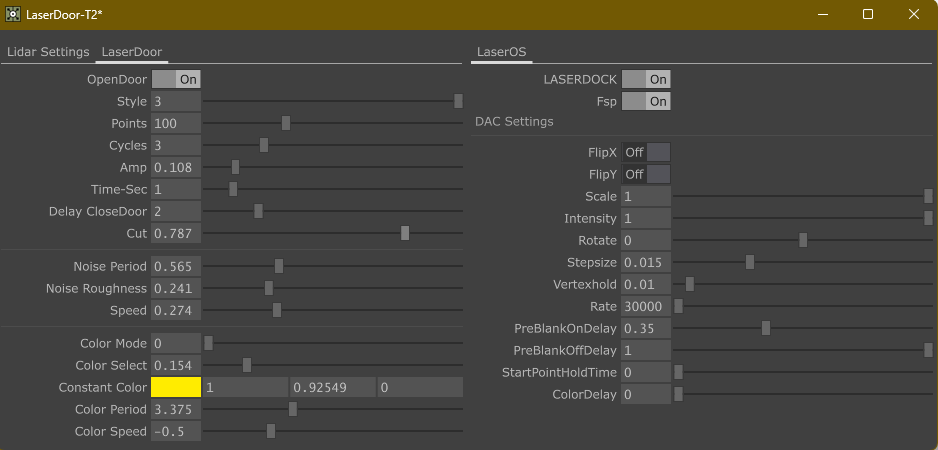
3. The right section of the software interface is for settings related to the laserdock DAC box.
The first item is the laserdock switch . The Fsp option is used to increase the brightness of the laser fixture.
Next is the DAC setting section, where you can toggle the horizontal and vertical flip functions by FlipX/FlipY. You can adjust the size and brightness of the laser output image, as well as the rotation angle of the output graphic.
The following options are not recommended to be adjusted
unless there is a special need.
For the laser stepsize value, it should be adjusted according to the actual laser output situation. The default stepsize value is 0.015, and the vertex hold default value is 0.1. You can adjust these settings as needed to ensure more stable laser output.
The start point hold time option has a default value of 0. If there is a trailing effect at the start point of the laser output image, you can adjust this option to eliminate it.
The sampling rate is set at 30,000. If the laser you are using has a different sampling rate, please connect a keyboard and a monitor to make adjustments; this option cannot be directly adjusted on the mobile browser interface.
The **PreBlankOnDelay** and **PreBlankOffDelay** options are usually kept at their default settings. If you feel that the edges of the pattern are not perfect, you can try adjusting these two options.
Final
When you connect the sensor and laserdock, and then plug in the power supply, the Mini-PC will automatically boot up. After booting, it will automatically run the Laserdoor software and create a hotspot named **LaserDoor** with the password: **88888888**. Once you connect your phone to this hotspot, you can directly use your phone’s browser to open the URL: **192.168.137.10:666**. Opening this webpage will display the interface on the right side, allowing you to proceed with further debugging.